
Incus Cluster with Ceph and OVN on Hetzner
Your own private cloud, without a data center of your own. Public cloud is out when the data is too sensitive, an own data center is too expensive for a small team. Rented bare metal sits in between: the hardware belongs to Hetzner, the platform on it is yours.
Incus is lean, quick to learn, and now part of the Linux Foundation, which counts for a platform you plan to run for years.
Three bare-metal servers, Hetzner vSwitches and the Ansible roles of incus-deploy. At the end there is an Incus cluster with Ceph as shared storage and OVN for the instance networks, and a VM that reaches the internet. Every command below was run on a real setup.
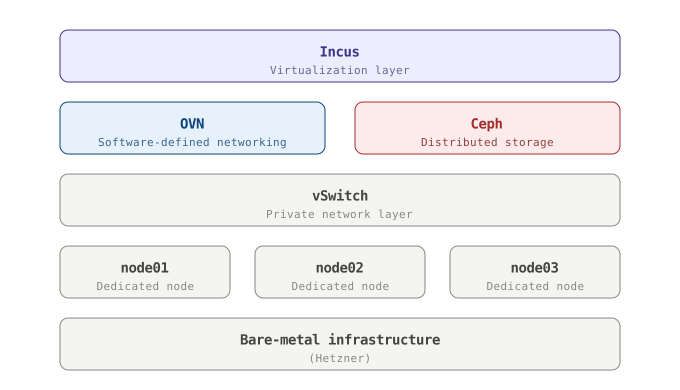
What you need
- Three Hetzner dedicated servers, each with at least one extra disk for Ceph
- Five vSwitches with the VLAN IDs 4010 to 4014, all three servers attached
- Optional: an additional public subnet for the vSwitch with VLAN 4012
- SSH access as root from the node that runs Ansible to all three nodes
In Hetzner Robot, each vSwitch gets exactly one VLAN ID, and a server can
be attached to at most five vSwitches. Five VLANs is therefore the maximum
per server, and this setup uses all of them. You create them under
Server → vSwitches, then attach the servers with Add server. The
Hetzner vSwitch documentation
describes the steps and the limits.
For SSH access there is nothing extra to do: the Hetzner installer places
the SSH public key you selected in Robot into authorized_keys of root on
every node. Ansible logs in with the matching private key. If Ansible runs
on one of the nodes, connect to it with ssh -A, so the key from your
machine travels along.
The nodes are called node01, node02 and node03. The names appear in
/etc/hosts, in ~/.ssh/config and in the inventory, so if you pick other
names, change them everywhere.
The network plan
Every kind of traffic gets its own VLAN. That keeps Ceph replication away
from the overlay network and makes tcpdump sessions short.
| VLAN | Bridge | Network | Used for |
|---|---|---|---|
| 4010 | mgtm0 |
172.18.18.0/24 | management |
| 4011 | ovrl0 |
172.18.10.0/24 | OVN overlay and Incus cluster API |
| 4012 | none | public subnet | optional public network pblc0 |
| 4013 | strg0 |
172.18.80.0/24 | Ceph public network |
| 4014 | strg1 |
172.18.81.0/24 | Ceph cluster network |
The last octet of each address is the node ID: 32 for node01, 33 for node02
and 34 for node03. The node script reads it from /etc/hosts, so the same
script runs on all three nodes.
The stack is IPv4-only, one stack is easier to keep track of. IPv6 can be added later.
MTU 1400, and 1342 inside OVN
Hetzner asks to limit the MTU on vSwitch interfaces to 1400, so every VLAN
runs with 1400. OVN wraps instance traffic in Geneve, which costs another 58
bytes. The OVN network therefore gets bridge.mtu: 1342.
Get it wrong and small packets work while large ones vanish. ping is happy, apt update hangs.
Install Ubuntu on the nodes
Boot every node into the Hetzner rescue system and install Ubuntu 24.04
with installimage. Replace [HOSTNAME] with node01, node02 or node03,
and check with lsblk that the system disk really is /dev/sda. Servers
with NVMe disks call it /dev/nvme0n1.
# On each node, in the rescue system
cat > ~/install.conf <<EOF
DRIVE1 /dev/sda
SWRAID 0
SWRAIDLEVEL 6
HOSTNAME me
Ubuntu-2404-noble-amd64-base
USE_KERNEL_MODE_SETTING yes
PART /boot  ext3     1024M
PART /boot/efi esp 256M
PART lvm    system   all
LV system   root   /        xfs          16G
LV system   swap   swap     swap          4G
LV system   home   /home    xfs          64G
LV system   varlog /var/log xfs          16G
LV system   tmp    /tmp     xfs          16G
IMAGE /root/.oldroot/nfs/install/../images/Ubuntu-2404-noble-amd64-base.tar.gz
EOF

# install
installimage -c ~/install.conf -n [HOSTNAME] -d /dev/sda -s en -t yes
The system disk belongs to the OS, Ceph gets the extra disks.
Configure the nodes
Run this on every node after the first boot. It sets up /etc/hosts, Open
vSwitch, the VLANs with their bridges, a firewall and the SSH client, then
reboots.
The firewall drops everything from outside except SSH. Private networks are allowed, so the nodes talk to each other freely over the VLANs.
# On each node as root
##############################################################################
# /etc/hosts
# remove short name aliases, relevant for ceph deployment
sed -i -E "s/(node01|node02|node03)$//" /etc/hosts

# add entries for the storage0 (ceph public network)
cat >> /etc/hosts << EOF
172.18.80.32 node01  node01.strg0
172.18.80.33 node02  node02.strg0
172.18.80.34 node03  node03.strg0
EOF
##############################################################################
# vars
MY_ID=$(
  cat /etc/hosts | grep strg0    | grep "$(hostname -s)" \
    | awk '{print $1}' | awk -F. '{print $4}'
)
MY_NIC=$(ip route | grep default | awk '{print $5}')

##############################################################################
# network
hostnamectl set-hostname $(hostname -s)

# install some packages
apt update
apt install -y openvswitch-common openvswitch-switch python3-openvswitch

cp /etc/netplan/01-netcfg.yaml /etc/netplan/01-netcfg.yaml.orig

# enforcing an ipv4-only stack for predictability
sed '/- 2a01:4f8:/d; /- to: default/,/via: fe80::1/d; /- 2a01:4ff:/d' -i  /etc/netplan/01-netcfg.yaml
sed '/ethernets:/!b;n;a \      link-local: [ ]'                       -i  /etc/netplan/01-netcfg.yaml

cat > /etc/netplan/10-vswitch.yaml  <<EOF
---
#
# Bridges and vlan are working independet from main enterface enp7s0 setup (linux ip/ ovs)
#
network:
  bridges:
    mgtm0:
      interfaces: [vlan4010]
      addresses:
        - 172.18.18.$((MY_ID))/24
      dhcp4: false
      dhcp6: false
      link-local: []
      openvswitch: {}
    ovrl0:
      interfaces: [vlan4011]
      addresses:
        - 172.18.10.$((MY_ID))/24
      dhcp4: false
      dhcp6: false
      link-local: []
      openvswitch: {}
    strg0:
      interfaces: [vlan4013]
      addresses:
        - 172.18.80.$((MY_ID))/24
      dhcp4: false
      dhcp6: false
      link-local: []
      openvswitch: {}
    strg1:
      interfaces: [vlan4014]
      addresses:
        - 172.18.81.$((MY_ID))/24
      dhcp4: false
      dhcp6: false
      link-local: []
      openvswitch: {}
  vlans:
    vlan4010:
      id: 4010
      link: $MY_NIC
      mtu: 1400
      dhcp4: false
      dhcp6: false
      link-local: []
    vlan4011:
      id: 4011
      link: $MY_NIC
      mtu: 1400
      dhcp4: false
      dhcp6: false
      link-local: []
    vlan4012:
      id: 4012
      link: $MY_NIC
      mtu: 1400
      dhcp4: false
      dhcp6: false
      link-local: []
    vlan4013:
      id: 4013
      link: $MY_NIC
      mtu: 1400
      dhcp4: false
      dhcp6: false
      link-local: []
    vlan4014:
      id: 4014
      link: $MY_NIC
      mtu: 1400
      dhcp4: false
      dhcp6: false
      link-local: []
EOF
chmod 600 /etc/netplan/10-*
netplan get
netplan apply

##############################################################################
# firewall

cat > /etc/nftables.conf <<EOF
#!/usr/sbin/nft -f

flush ruleset

table inet filter {
        chain input {
                type filter hook input priority filter;
        }
        chain forward {
                type filter hook forward priority filter;
        }
        chain output {
                type filter hook output priority filter;
        }
        chain input {
                type filter hook input priority filter; policy drop;
                iif "lo" accept
                ct state established,related accept
                tcp dport 22 accept
                ip saddr { 10.0.0.0/8, 172.16.0.0/12, 192.168.0.0/16 } accept
                drop
        }

    chain output {
        type filter hook output priority filter; policy accept;
    }
}
EOF
systemctl enable nftables
systemctl daemon-reload

##############################################################################
# misc

cat > ~/.ssh/config <<EOF
Host node01 node02 node03 *.localdomain
    StrictHostKeyChecking no
    UserKnownHostsFile /dev/null
    LogLevel ERROR
EOF

# reboot
reboot
After the reboot, check that the nodes see each other on the storage VLAN:
ping -c3 <HOST_NAME>
Prepare Ansible
Ansible runs on one of the nodes, or on a fourth machine with access to the VLANs. It gets its own Python through pyenv, so nothing collides with the Python packages of Ubuntu.
# On the Ansible node as root
apt install -y make build-essential libssl-dev zlib1g-dev \
libbz2-dev libreadline-dev libsqlite3-dev wget curl llvm \
libncursesw5-dev xz-utils tk-dev libxml2-dev libxmlsec1-dev libffi-dev liblzma-dev

# Install pyenv
curl https://pyenv.run | bash
echo 'export PYENV_ROOT="$HOME/.pyenv"'                                >> ~/.bashrc
echo '[[ -d $PYENV_ROOT/bin ]] && export PATH="$PYENV_ROOT/bin:$PATH"' >> ~/.bashrc
echo 'eval "$(pyenv init -)"'                                          >> ~/.bashrc
source ~/.bashrc

# Install virtualenv with pyenv
pyenv install 3.13.1
pyenv virtualenv 3.13.1 incus_deploy
pyenv activate incus_deploy
pip install -U pip pipenv
source ~/.bashrc

# Clone the repository
git clone https://github.com/lxc/incus-deploy.git
cd incus-deploy/ansible/
# the tested state of the roles
git checkout a01755a4a917884fd67f996ca76d0ad64dd98e59
# setting to put dependencies within virtual env
sed "/\[defaults\]/a home=\$VIRTUAL_ENV/.ansible" -i ansible.cfg

# Install dependencies
pipenv install
ansible-galaxy install -r ansible_requirements.yml
The git checkout pins incus-deploy to the commit this guide was tested
with, from March 2026. Newer commits may bring fixes, but also changes that
no longer fit the inventory below.
Write the inventory
The inventory describes the three nodes and everything that runs on them.
All three nodes carry every role: Ceph mon, mgr, mds and osd, OVN
central and host, Incus cluster and ui. With three nodes there is
no room for dedicated controllers, and every node can fail without taking
a service with it.
Ceph talks on the storage VLANs, OVN and the Incus API on the overlay VLAN. Nothing of it listens on the public interface.
Three things in it are yours to fill in:
- OSD disks: the
[SOME_ID]entries underceph_disks. The comment in the file shows a command that lists candidates. Leave out the system disk. ceph_fsid: the ID of your Ceph cluster. Generate your own withuuidgen.pblc0: the address of your additional subnet. Without one, delete the wholepblc0block.
The instances get three networks:
UPLINK, an OVS bridge on each node with NAT, the way out for OVNovn-test, the default OVN network for the first instancespblc0, optional, a bridge on VLAN 4012 with addresses from the additional Hetzner subnet. Instances on it get a public address and reach the internet directly, tested on all three nodes.
# On the Ansible node, in incus-deploy/ansible/
cat > hosts.yaml <<EOF
all:
  children:
    incus_servers:
      children:
        baremetal:
          hosts:
            node01:
              # TODO: put here disk ids available to create OSDs on
              #       you can run the following command on each node,
              #       to file the suitable candidates:
              #
              #       ls  /dev/disk/by-id/ | grep -i -E "nvme|ssd" | awk '{print "- data: "\$1}'
              #
              ceph_disks:
                - data: [SOME_ID]
                - data: [SOME_ID]
                - data: [SOME_ID]
            node02:
              ceph_disks:
                - data: [SOME_ID]
                - data: [SOME_ID]
                - data: [SOME_ID]
            node03:
              ceph_disks:
                - data: [SOME_ID]
                - data: [SOME_ID]
                - data: [SOME_ID]
  vars:
    #
    # ansible
    #
    ansible_python_interpreter: auto_silent
    #
    # ceph
    #
    ceph_fsid:             "a075071e-7fb2-4d49-a741-9ab391f2fbad"
    ceph_network_public:   '172.18.80.0/24'
    ceph_network_private:  '172.18.81.0/24'
    ceph_rbd_cache:        "2048Mi"
    ceph_rbd_cache_max:    "1792Mi"
    ceph_rbd_cache_target: "1536Mi"
    ceph_release:          "distro"
    ceph_ip_address:       ""
    # NOTE: all nodes will have the same roles in the ceph cluster
    ceph_roles:
      - client
      - mon
      - mds
      - mgr
      - osd
    #
    # OVN
    #
    ovn_name:       bolt
    ovn_release:    distro
    ovn_ip_address: ""
    ovn_roles:
      - central
      - host
    #
    # incus
    #
    incus_init:
      network:
        #
        # UPLINK network to connect with world outside of the platform
        #
        UPLINK:
          type: bridge
          config:
            bridge.driver:   openvswitch
            bridge.mtu:      1500
            ipv4.address:    172.18.20.1/24
            ipv4.ovn.ranges: 172.18.20.64-172.18.20.127
            ipv4.nat:        true
            ipv4.dhcp:       false
            ipv6.address:    none
          description: "Uplink via infra hosts"
        #
        # Just a network to create first workloads in, connected with UPLINK
        #
        ovn-test:
          type: ovn
          config:
            network:          UPLINK
            ipv4.address:     10.10.10.1/24
            ipv4.nat:         true
            ipv4.dhcp:        true
            ipv4.dhcp.ranges: 10.10.10.64-10.10.10.127
            ipv6.address:     none
            bridge.mtu:       1342 # NOTE: network backed by VLAN with MTU=1400
          description:        "OVN test network"
          default: true
        #
        # Additional public(internet) network can be used to get ips from
        #
        pblc0:
          type: bridge
          config:
            ipv4.dhcp:                  false
            ipv4.address:               116.202.68.154/29
            ipv4.dhcp.ranges:           116.202.68.155-116.202.68.158
            ipv4.nat:                   false
            ipv6.address:               none
            ipv6.nat:                   false
            dns.mode:                   none
            bridge.mtu:                 1400
            bridge.driver:              openvswitch
            bridge.external_interfaces: vlan4012
          description:                  "Hetzner additional network"
      storage:
        octopet:
          driver:              "ceph"
          description:         "Default"
          local_config:
            source:            "bolt"
            ceph.cluster_name: "ceph"
          default: true
    incus_ip_address: ":18443"
    incus_name:       bolt
    incus_release:    stable
    incus_roles:
      - cluster
      - ui
EOF
Write the playbook
The playbook replaces the deploy.yaml that ships with incus-deploy. It
runs four roles in order: system settings, Ceph, OVN and Incus.
# On the Ansible node, in incus-deploy/ansible/
cat > deploy.yaml <<EOF
- hosts: all
  gather_facts: true
  gather_subset:
    - "default_ipv4"
    - "!default_ipv6"
    - "distribution_release"
  pre_tasks:
    - name: Inject inventory ceph_ip_address into the facts dictionary
      set_fact:
        ansible_ceph_ip_address: ""
  roles:
    - system_settings
    - ceph
    - ovn
    - incus
EOF
Deploy
# On the Ansible node, in incus-deploy/ansible/
ANSIBLE_ROLES_PATH=../roles ansible-playbook deploy.yaml
The run takes about an hour.
Check the result
# On any node
# list nodes in cluster
incus cluster ls

# list networks
incus network ls

# list storage
incus storage ls

# create a new instance in the default (ovn-test) network
incus launch images:ubuntu/24.04 test01 --vm  -c limits.cpu=1   -c limits.memory=4GiB

# test connectivity
incus exec test01 -- ping -c3 8.8.8.8

# install tools
incus exec test01 -- apt update
incus exec test01 -- apt install -y curl tcpdump arping net-tools

# test
incus exec test01 -- curl ifconfig.io
Three cluster members online, a Ceph pool as default storage, and a VM that
answers from the outside world. curl ifconfig.io shows the public address
of the node the VM leaves through.
When this setup fits
The setup fits when you need control over your data, don’t want to run a data center, and accept Hetzner as part of your infrastructure. It does not fit when you need guaranteed SLAs (contractual availability), compliance beyond data residency, or a team without the time to learn a new platform.